The ‘Late’ British Tank That Outlasted The Panther And Armed 6 Nations After The War D
February 1944, the Leyland Motors proving ground, Lancashire, England. A new tank rolls off a flatbed transporter and settles onto frozen mud. It is low, angular, and fast-looking. 33 tons of welded steel riding on wide tracks and powered by a 600 horsepower Rolls-Royce Meteor engine, the same bloodline as the Merlin that won the Battle of Britain.
Bolted into its turret is a gun that no British cruiser tank has ever carried before, a high-velocity 77 mm weapon derived from the 17-pounder. The only Allied anti-tank gun proven to kill a tiger. It was late. Everyone knew it was late. The men who designed it knew it. The war office knew it.
The tank crews burning alive in Shermans across Normandy would not receive it for another year. By every reasonable measure, this machine had missed the war. And yet, within weeks of reaching the front line, tanks exactly like this one would cross the Rhine, destroy the last operational tiger in northern Germany, and race 400 miles across the autobahns to the Baltic Sea, collecting 80,000 prisoners and 27 generals on the way.
It would go on to serve six nations on four continents and remain in military service for more than two decades after the war ended. Its designation was the tank cruiser Comet I, A34, and it was the finest tank Britain fielded in the Second World War. To understand why the Comet existed, you need to understand the problem Britain faced in 1943.
British cruiser tanks were dying. The Crusader had been mechanically fragile in the desert. The Cromwell, its replacement, was fast and reliable, but fundamentally undergunned. Its 75 mm gun could throw a decent high-explosive shell at infantry positions, but against the frontal armor of a Panther or Tiger, it was close to useless. Crews knew it.
Commanders knew it. The gap between what British tanks could do and what German tanks could survive was measured in burning hulls. The answer existed. The 17-pounder anti-tank gun had been in service since early 1943, and it could kill anything the Germans put on the battlefield. The problem was fitting it inside a tank.
The A30 Challenger attempted exactly that, stretching the Cromwell hull and bolting on a tall, ungainly turret to house the 17-pounder and its massive ammunition. The result was top-heavy, conspicuous, and produced in small numbers. It was not the solution. The Sherman Firefly, a standard Sherman rework to accept the 17-pounder, was the desperate stopgap.
One Firefly was issued per troop of four tanks, and German gunners learned to identify and target it first. Its tall silhouette made it easy to find. Its deleted hull machine gun left the crew exposed to infantry. It worked because it had to. It was not enough. Leyland Motors, already building Cromwells and Centaurs, received the contract for a purpose-built replacement.
Design work on the A34 began in the middle of 1943 under close collaboration with Rolls-Royce and the Birmingham Railway Carriage and Wagon Company. The key decision was the gun. The full 17-pounder was too long, and its ammunition too bulky for any turret that could fit on a Cromwell-width hull without repeating the Challenger’s mistakes.
The solution was elegant and pragmatic. Engineers developed a new weapon that fired the same 76.2 mm projectile as the 17-pounder, but from a shorter, more compact cartridge case derived from the 3-in 20 hundredweight anti-aircraft gun. The result was roughly 10% less muzzle velocity than the full 17-pounder, but a dramatically smaller breech, easier ammunition handling, and crucially, an effective high explosive round that the 17-pounder lacked entirely.
It was designated the 77 mm high velocity, a name chosen purely to prevent logistical confusion with the 17-pounder, the American 76 mm, and the British 3-in gun. All four were actually 76.2 mm caliber. The name was bureaucratic. The gun was lethal. The vehicle itself was a masterpiece of practical engineering.
Modification to the Cromwell was so extensive that the Tank Museum at Bovington records only about 40% of the parts remained unchanged. The hull was fully welded. The turret was a composite of cast and welded armor with 102 mm on the front face. The upper hull carried 76 mm of frontal protection.
The suspension was strengthened Christie type fitted for the first time on a production British cruiser with four track return rollers and the tracks themselves were widened to 18 in reducing ground pressure compared to the Cromwell. Electric turret traverse borrowed from the Churchill gave the gunner smooth precise rotation.
The Rolls-Royce Meteor Mark III, a 27 L V12 petrol engine derived from the Merlin, delivered 600 horsepower. Top speed was governed at 32 mph deliberately limited from the Cromwell’s 40 plus to preserve the drivetrain and tracks over long advances. Cross-country, the Comet managed 16 mph. Range was approximately 125 mi on 120 imperial gallons of fuel.
The crew numbered five: commander, gunner, loader, driver, and hull gunner. 61 rounds of 77 mm ammunition was stowed in armored bins. The gun could fire armor-piercing capped ballistic cap rounds at roughly 2,575 ft per second penetrating approximately 110 mm of armor at 500 m. An armor-piercing discarding sabot round was also developed achieving 3,600 ft per second and penetrating roughly 165 mm at the same range.
Though there is credible evidence this round may not have been issued in combat before the war ended. With standard ammunition, the Comet’s gun sat between the American 76 mm and the full 17 pounder in hitting power. It could not reliably penetrate the Panther’s upper glacis, 80 mm set at 55 degrees, but it could kill a Panther through the turret front and mantlet at combat range and through the flanks at virtually any range.
Firing trials against a captured Panther confirmed both the gun’s capability and its limits. A mild steel prototype ran in February 1944. Production deliveries began that September. 1,186 Comets were built before production ceased in May 1945, but the tank that should have fought at Normandy would not see combat until the final weeks of the war.
Now, before we get into where this tank actually fought, if you are enjoying this deep dive into British armored engineering, hit subscribe. It takes a second, costs nothing, and helps this channel bring you more stories like this one. The 11th Armored the famous Black Bull was the first and only formation fully equipped with Comets by the war’s end.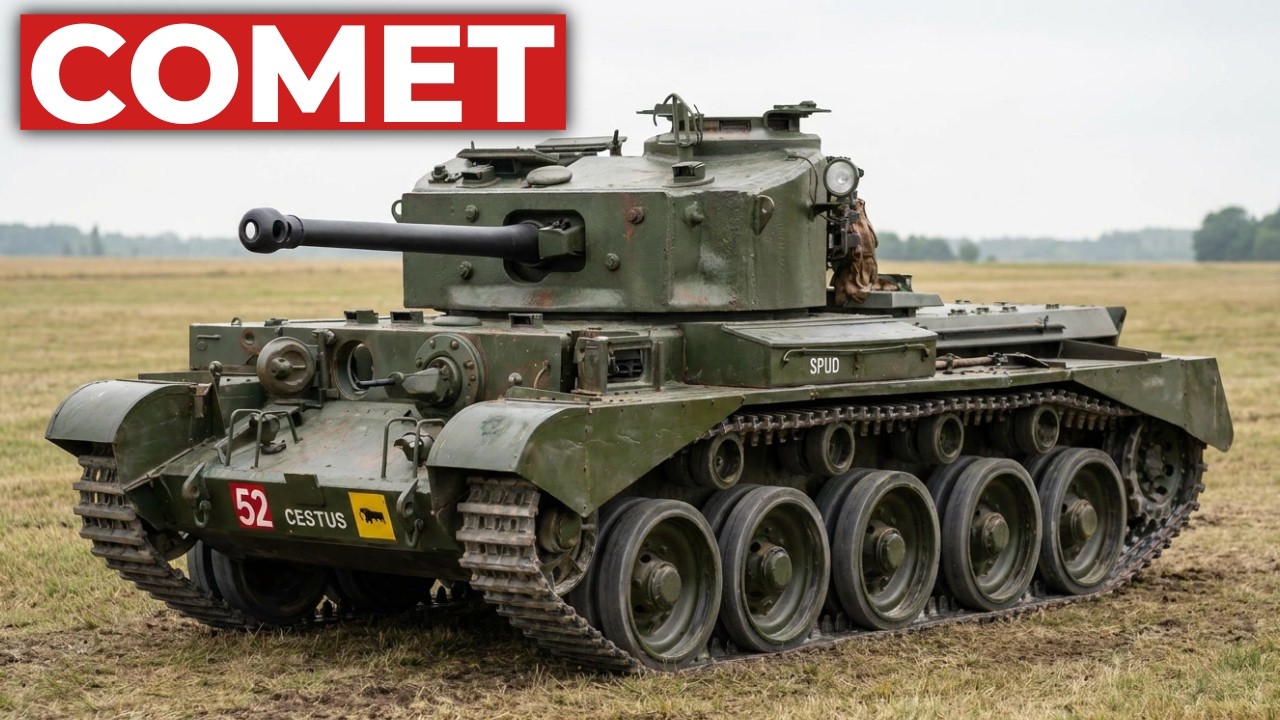
Its 29th Armored Brigade comprising the 3rd Royal Tank Regiment, the 23rd Hussars, and the 2nd Fife and Forfar Yeomanry began converting from Shermans in December 1944 near Brussels. The conversion was immediately disrupted. The German Ardennes Offensive forced the Brigade to take its old Shermans back into the line.
Only in mid-January 1945 did crews return to complete the changeover, conducting gunnery training at Gravelines in February. The Comet’s first major action came with Operation Plunder, Field Marshal Montgomery’s Rhine crossing on the night of March 23, 1945. The 11th Armored crossed at Wesel and broke out east, acting as the spearhead exploitation force.
Second Army Commander Sir Miles Dempsey had called the 11th Armored an outstandingly fine division, and now he turned it loose. From that moment, the division did not stop. It fought from river to river across northern Germany, the Weser, the Leine, the Aller, the Elbe, cracking resistance at each crossing and racing through the gaps.
The Comet proved itself ideally suited to this kind of warfare. It was fast enough to exploit breakthroughs, reliable enough to cover enormous distances without mechanical failure, and armed well enough to deal with whatever armor the disintegrating Wehrmacht could still muster. The most documented Comet engagement came on April 12 and 13, 1945, near the Aller River and the Essel Forest.
There, the last operational Tiger 1 in northern Germany belonging to Gruppe Fehrmann, a scratch unit assembled from the falling Bostal Tank School, ambushed tanks of a squadron, 3rd Royal Tank Regiment. The Tiger, designated F01, was a hybrid vehicle built from an early production hull and a late war turret fitted with steel road wheels.
It knocked out two Comets in rapid succession before withdrawing into the forest. Artillery was called in. The Tiger pulled back further but remained operational. The following day, a Comet of C Squadron commanded by Sergeant Harding flanked the Tiger through the trees. At approximately 100 yd, Harding put a 77 mm round through the Tiger’s side armor.
The fuel ignited. The crew bailed out with minor burns scrambling into the undergrowth. The British held their fire and let them go. Sergeant Harding was awarded the Military Medal. It was one of the last tank versus tank engagements of the war in Europe. The division then drove for the Baltic. Under Major General George Philip Bradley Roberts, known universally as Pip Roberts, the youngest British divisional commander of the Northwest Europe campaign at 37 years old, the 11th Armored crossed the Elbe at Artlenburg on April 30, took Lübeck on May 2, and reached Travemünde the following day. On the autobahns, the Comets exploited their speed to the limit. Veterans recalled tanks screaming across the countryside at full throttle, stowage flying off the back decks, infantry passengers clinging on. According to the divisional history, the Black Bull finished the war by patrolling the surrounding countryside collecting 80,000 prisoners, including 27 generals. In total, 26 Comets were recorded lost in action during the entire war. 23 Hussars veteran Reg Snowling later
recalled that the Comets were a vast improvement on the Shermans, praising the higher speed, lower silhouette, thicker armor, and last but not least, the 77 mm gun. Finally, the tank crews had a weapon that could pierce the armor of German tanks. On paper, the Panther looked superior.
Its 75 mm KwK 42 gun out penetrated the 77 mm with standard ammunition, achieving roughly 935 m/s muzzle velocity against the Comet’s 785. Its frontal glacis was effectively immune to the 77 at combat range, but the Panther in 1945 was not the Panther of the specification sheet. Final drive failures crippled entire companies.
Fuel shortages left them stranded. Factories were being bombed. Replacement crews were half trained. The Comet, powered by the proven Meteor, ran reliably for hundreds of miles across broken roads and open country without mechanical collapse. It was lower, harder to spot, faster to traverse its turret, and carried a genuinely useful high explosive round for the infantry support role that consumed most of a tank’s ammunition in practice.
Crews who operated both considered them broadly equal in combat. The difference was that the Comet arrived at the fight. The Panther increasingly did not. Against its own predecessor, the comparison was stark. The Cromwell’s 75 mm gun could not penetrate a Panther’s turret front at any range. The Comet’s 77 mm could do it at 500 m.
That single improvement, the ability to kill what was shooting at you, transformed the experience of every man inside the turret. Against the Sherman Firefly, the Comet was the clear successor. The Firefly hit harder with the full 17-pounder, but it was tall, conspicuous, and purpose targeted by German gunners.
The Comet was faster, lower, better balanced, and a purpose-built fighting vehicle rather than a conversion. Against the American M26 Pershing, the comparison reversed. The Pershing was heavier at over 40 tons, carried a 90 mm gun, and offered thicker armor, but it was slower, underpowered for its weight, and plagued by transmission problems.
Both tanks arrived in equally small numbers in the war’s final months. Neither fought the great armored battle it was designed for. The Centurion replaced the Comet in British frontline service from 1949 onward, incorporating lessons from the A34, but using Horstmann suspension, a 20-pounder gun, and heavier armor.
Comets remained in secondary roles for over a decade. They served with the British Army of the Rhine, garrisoned Berlin with the Berlin Independent Squadron of the Royal Tank Regiment, patrolled the Suez Canal Zone, and held Hong Kong, where bridges could not support the heavier Centurion. Despite persistent claims the Comet was not used in the Korean War, British and Commonwealth armor in Korea consisted of Centurions, Churchills, and Cromwell reconnaissance tanks.
Photographs sometimes captioned as Comets in Korea actually show Hong Kong-based tanks on live-firing detachments in Malaya. The Tank Museum records that the Comet was finally withdrawn from British service in Hong Kong in 1960. Finland operated 41 Comets until 1970. The Republic of Ireland bought eight in 1958.
South Africa, Burma, and Cuba all received small numbers. Roughly two dozen survive today, including several in running condition at The Tank Museum, Bovington, and at the Curragh Camp in Ireland. February 1944, the Leyland proving ground. A new tank settles onto frozen mud, low and angular, its turret carrying a gun that no British cruiser has mounted before. It was late.
It was unquestionably, undeniably late. It missed the desert. It missed Normandy. It missed the bocage, the breakout, and the long autumn slog through the low countries. It carried no sophisticated fire control, no infrared sighting, no stabilized gun. It was, by the time it reached the front, already being overtaken on the drawing board by the Centurion. And yet it worked.
It worked on the bridges at Wesel. It worked in the forests at Essel. It worked on the autobahns to Lübeck and the roads to the Baltic. It worked because it was fast, because it was reliable, because its gun could finally kill what it was aimed at, and because the men inside it trusted it enough to drive flat out into the collapsing Reich without hesitation.
The Comet was not the tank that won the war, it was the tank that proved Britain had learned how to build one. That is not luck, that is engineering arriving exactly when it mattered.